Tuesday, September 24, 2013

Importing Grades From Schoology Into Progress Book


Download the grade file from Schoology.

Go to Gradebook ->select the options dropdown box -> select export from the list.

Export Gradebook as CSV (select first radio button) -> press Next


Select a location to save.


In a separate file compile a list of student ids

Save that file!


Insert a blank column to the right of the student id and open the CSV file that was downloaded from Schoology in Microsoft Excel. Arrange the windows to be side-by-side.

Find the column containing the assignment you wish to copy. Select the column from the Schoology .csv file you downloaded, select copy,
then select column B of your Excel file containing userid numbers. Paste the grades into column B.
Save the file with student IDs as file type .CSV. I save my file {assignment_name.CSV}.

MUST save as CSV.

I do several assignments at a time copy the column with the scores into column B (next to the ids) save as {assignment_name.CSV}. When you are ready to import the marks into Progress Book login to progress book. Create the assignment if it’s not already created (my assignments are generally already created so I can post them to the homework page), after the assignment is created and points are assigned and it is saved you can select the Marks tab.

From the marks tab, select the Import the Marks link.

Choose the file that contains your marks (you just saved it .CSV -> select Yes to the first row contains headers questions -> Press Import the marks button. Once Marks import select save. If there are no values for a student in Schoology fill-in with Missing/Excluded/or a 0 after saving. Repeat as much as needed!

Guided Notes

Lectures can be such a bore, yet sometimes lectures are the simplest way to get initial information to a large group of students or participants in a professional audience. Guided notes are tools for teachers and lecturers to maintain interest in the material being delivered. Instead of expecting individuals to pull out important information from a lecture, the notes are provided in advance and key words are given. So how do I make this happen, easily?
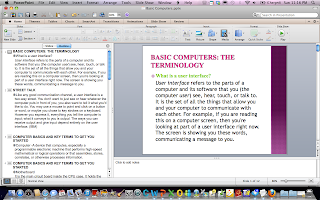
First open your PowerPoint presentation. Click on the outline view in the slide panel. Now you can see your entire presentation in a concise (or not so much) Outlined list. Click anywhere in the list. 
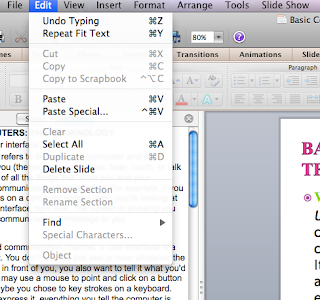
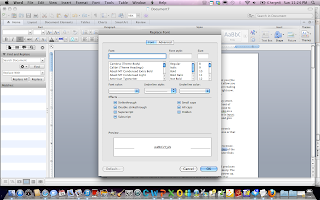
Now, the next step is dependent on your PowerPoint version. Screen shot of Office 2011 for Mac shows that you will go to the Edit menu, then select all. On Windows version you will find select all on the Home ribbon to the far right. Either way, find select all. This action will select all text in the outline panel. Copy the highlighted text: take your pick of methods…Edit->copy, right-click->copy, ctrl+c (Windows) or command+c (Mac) 
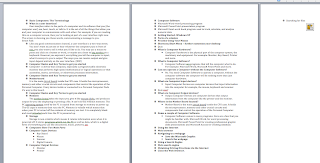
Then open your word processing software. Paste the text into the word processor. You should have an outline of your entire presentation.
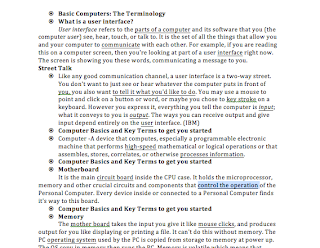
Read through the entire presentation and underline the words you want lecture participants to fill-in. Once everything is underlined, save your notes. Now you will use the replace feature of your word processor.
An easy way to get the replace dialog box to open in Windows is ctrl+f, for the Mac select edit->find->advanced find and replace. Next is the hidden secret of find/replace. With your cursor in the first text box Select format button->font-> then select underline in the format dialog box. Click OK

Select the next dialog box, press the space key 10 – 25 times depending on the size of the text string you are replacing, Select format button->font-> then select underline in the format dialog box. Click OK
Click replace all, and allow the program to replace all your underlined words with black underlines.

Save As this document, I usually add _student to the current name. and viola. Quickly turn your presentation into guided notes for your audience.

Why Guided Notes? Even by the college level a 1985 study found that only 50% of the main ideas were captured in traditional note taking. Throughout the years, educators looked for ways to make taking notes more effective and guided notes is one way of getting the notes delivered to students. The guided notes techniques are especially popular with differentiating learning within the concepts of inclusion learning. As instructors started to see the benefits of guided note taking with students in special education they found there were benefits for all students as well. Of course, to some individuals they believe there are negatives as well. Positives Main ideas are obvious. Absent students are easily able to obtain notes. Students are more engaged in note taking exercise. Almost entire lecture is available to the student to review. Negatives Students are not finding the main ideas within the lecture on their own. Higher cost in paper and materials in preparation of the lecture. Students may only focus on key words instead of the entire message. Students do not have their own words to make the lectures meaningful to them. Takes more time to prepare. The negatives highlighted point to the lack of student accountability in the learning process and preparation on the lecturer. With these simple steps, if you are going to prepare a presentation anyway, the additional preparation time for guided notes is almost non-existent. If this is the sole form of note taking we are not balancing skills from an educator point-of-view, however if used as a model of picking out key terms and mixed with other note taking skills, guided notes could lead to students being more prepared to take notes independently after the modeling is completed. Students: Skills for the 21st Century Ask students to prepare guided notes for their classmates on a chapter in the book. Maybe even have them work in teams. After you model a couple chapters you pass the prep-time to the student, you evaluate their understanding of the material, you teach students 21st century skills, and you allow them the opportunity to take notes independently selecting the main ideas and supporting details. It's a win-win.

Resources: http://www.interventioncentral.org/academic-interventions/study-organization/guided-notes-increasing-student-engagement-during-lecture- http://www.ncbi.nlm.nih.gov/pmc/articles/PMC1389604/ http://ada.osu.edu/resources/fastfacts/Guided-Notes-Fact-Sheet.pdf

Wednesday, September 18, 2013

Tech Tip Tuesday {BONUS}: Printing Student Progress Reports

Many schools are using Student Progress Reports instead of Interim Reports per Progress Book lingo.

Following the steps below allow teachers to print their own Interim Progress Reports and get a parent signature.


Printing Interims

For our purposes we are going to print interims by teacher/class via the Student Progress Report utility.


Visit progressbook.mveca.org


Select sign in.


Once on the Teacher Homepage aka Dashboard you can select a report.


From the report dropdown list select Student Progress Report


Then select Run button.

Select the course or courses you wish to print, then select the arrow to move them to the selected column.

Select the quarter you wish to print i.e QTR1

Then select parent sig. line and any other attributes you want on the document.

Finally select Submit button.


A pdf document will open and you can print to any printer attached to your computer.
I suggest printing to the elementary workroom copier. You will need to staple pages for the same student together. I do not suggest printing double-sided in the case that the report does not have 2 pages.

Tech Tip Tuesday: Gradebook Keeps Parents Informed


Did you know your gradebook may be a place for keeping students and parents informed more than what grade was received on the final project?

Progress Book allows teachers to maintain a class page for announcements and the best part I've found is that in addition to using the grade book, I can post homework to the homework page. By inputing my upcoming assignments BEFORE I'm ready to grade them I can check the post to homework page and parents and students can see upcoming homework on a calendar and agenda style format.

How it works:

Post Assignment to the Homework Web Page.

Input assignments in advance to post them to the homework web page. Give the assignment a description, select an assignment type, assign a due date, assign points and select post to homework web page.


This is what your parents will see.
They will know when it was assigned, and when it is due. They can see this in the same place where they are already viewing student grades without having to visit another site.


You can also Post Homework.
(This method will NOT add an assignment to your gradebook, you will still need to add assignment.)

Click the Post Homework link.

This window opens:

Select Add New Homework

Enter details, select a due date, select which classes the homework applies to, then click save at the bottom of this screen.


After you hit save on the previous screen new tabs will open. You can leave it as is or you can add a link to an online book/page/resource or you can add a file attachment. Select the appropriate tab, if you are adding an attachment enter a sequence number (which homework is it?), name the homework, click save.
An upload attachment button will appear. Click the upload attachment button, select your file, then save again.


Now parents have access to assignments at home if a student is absent or forgot their paper.