Tuesday, September 2, 2014

Brainstorming: Near and Far

Last week I decided I wanted to brainstorm ideas for an upcoming project in class.  Each student has a computer so I wanted to do it using their devices.  I considered a Google form but I wanted it to be in real time.  Google forms allow you to see previous responses AFTER you submit if the option is selected. Then I thought about Poll Everywhere but it's so difficult to organize the ideas and work on them later after collecting the data.  That's when a quick Internet search led me to Stormboard.  Stormboard is free to educators through December 2014 so check it out.

Stormboard allows you to collect ideas, color code them, vote on your favorite ideas and organize ideas in a number of creative ways.  I fould for large classes it works best if you only have 4-5 brainstormers at a time but you can enter your idea, rearrange and categorize it then print a report or Wordle of your results.

I created a Stormboard for us to use to brainstorm for fun!  What is your favorite Tech resource for your classroom?  

P.S. you can signup using your school Google account if you have one and have your students do the same.  THEN you can see their official names instead of them making up their own accounts.

P.P.S. I don't get anything for you using this service or following the link.  There is no free space etc.


Tuesday, August 26, 2014

Print Screen


This week's tech tip is simple!  Often you need to save a screen you were working on or an error message that just popped up but you can not save it in the traditional save as... method and there is no print button.  This is when print screen becomes beneficial.


  • On your PC/laptop the keyboard has a Print Screen or PRTSCR button.  When you press this in most cases you see nothing happen.  What occurs is a copy of the current screen to your clipboard.  
  • Then you can open a software program like Paint or Microsoft Word and simply paste.  You will see your picture and you can resize, crop, edit, and print or save.
start button


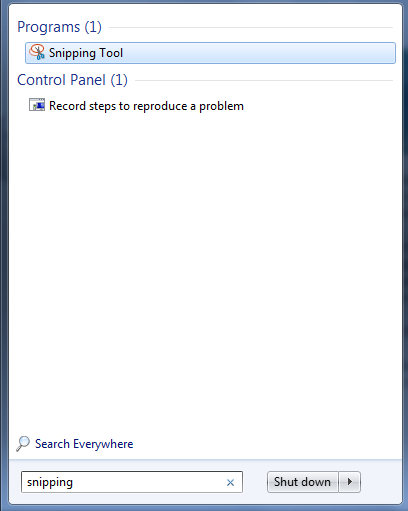
Another method is using the Snipping Tool.  At the Start button...


Search for Snipping.  If the tool is installed on your computer you will find the program.  Click on it one time.

When the tool opens you can choose New and click and drag a section of the screen to "snip".  Then you need to save the snipped portion.

On your Mac you will choose ctrl+shift+F3 for the entire screen or ctrl+shift+F4 for selecting a portion.


These saved pictures are especially helpful when sharing with Tech Support what you see on your computer screen and you need help.  Email the picture as an attachment so they know the exact message you are receiving.  Often they can diagnose a problem by looking at the picture. 

Happy snipping!

Friday, August 22, 2014

Connecting a Projector


Video: Connect to a projector

Getting back to school finds many teachers eager to show kids new "stuff" but what happens when you're prepared on your laptop and you want to show the entire class.  I received many questions this week stating "what's wrong with my projector?"

If you see your desktop background screen on your projector but not the“stuff” you want to project, odds are good that you are in extended screen mode. 

To fix this you go to start ->


control panel -> 


(depending on your setup you may have to go to appearance and settings before display) -> 


display ->


connect to a projector -> 


select duplicate.


Tuesday, May 6, 2014

Office Productivity: Find and Replace Paragraph Marks

Today I was working on a project (aka Resident Educator paperwork) and I learned a Tech Tip in Office Productivity myself. J

I had an email message and I wanted to copy the text into a form.  The comments were in response to an observation and I needed them to be on a special paper.  But when I pasted it the file formatting was not filling the page and it had too many “paragraphs”.  

In Tech a paragraph is a hard return, not what you think of as a paragraph from English class.
Anyway, I wanted them gone but I didn’t want to click and delete over and over. Hmmm!

That’s when I thought of find & replace. 

I use it all the time to replace he in a document to she, and that is where I found exactly what I was looking for. 
Click on Replace in a Word document Home Ribbon.  Click in the find what box and select the special button at the bottom of the window.  

Voila!  There is paragraph and a dozen or so other formatting characters that you might want to find and/or replace.  After selecting paragraph mark I then selected the replace field and typed a space (you cannot see it. 
Select replace all. Close the window and the text looks a lot better. Doesn't it?


What would you do to remove the > marks? Hmmm!  

Tuesday, April 29, 2014

Office Productivity: Text to Table

 I have my husband to thank for this week's Tech Tip.  When I asked him what should I do a Tech Tip on today he said, "Tables, everyone always messes up tables."  Well somehow if I know him he was talking about tables in HTML or Excel (not the kind you eat on, when we eat we don't need tables). Anyway, I got to thinking and I remembered that I just showed a student last week how to convert text to a table and maybe some of you didn't know it was so easy. Many people who used Microsoft Word before can Insert a table and add things to the blocks (cells). Well how many times have you had something typed up already and thought it would be easier to read as a table but didn't want to redo it?  I'm going to say it only takes 3 steps to convert text to a table (its all in perspective).  

So last week someone was typing their spelling words 3 times each.  I said that is hard to read, if you were doing it on paper maybe you would fold the paper in three columns first???  

Step 1 - Select all your text by highlighting it. 


Step 2 - Select Insert -> Table -> Convert Text to Table


Step 3 - Use the dialog box to indicate how you want to separate your text.  It's at the bottom of the box but should be done first.  I chose other and typed a space. (I know you cannot see it.) In this case there was a space between each word.  You might have a paragraph marker if you made a list or another character.  Then select the number of columns.  I wanted the 3 words to be in one row so I selected 3 columns in this case.  If you had student information you would have to see how you have it listed.  The program automatically figures out the number of rows.


Now you have a table.
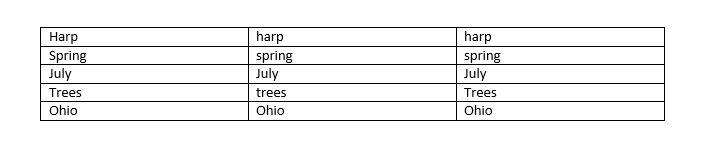
The rest is just for fun.  For example I want the word  Spring to be capitalized EVERY instance. I can select the column in front of the row, this highlights the row, and choose the Aa symbol on the Home tab. In this instance I changed the case to Capitalize Each Word.

Finally you can make the table uniquely yours by selecting the table (click anywhere on it) and select the Design tab that appears under Table tools.  You can make changes to the Design of the table to make it even more user friendly.

Quick and easy productivity for reusing documents that you already have created.

For more tips on working with tables please view Using Tables Microsoft Word 2013.

Tuesday, April 22, 2014

Office Productivity: Word to PowerPoint

Did you know you can easy copy and paste a Word document into a PowerPoint without having to re-type the entire thing?  I find it nice when you have an outline to be able to use it also as a presentation. I do this as a lesson in class but it is practical for any of us that need to put together a presentation. It’s also nice to take outlines or lesson plans and turn them into presentations and notes for our students.

Step-by-step instructions for Word 2013
  1. Open Word document that has your outline or notes.
  2. On the Home ribbon, choose select->select all.
  3. Copy your text.
  4. Open PowerPoint.
  5. Select blank presentation.
  6. Select view -> select outline view. (IMPORTANT!!!)
  7. Click in the outline pane. Paste.
  8. On the Home ribbon select layout->blank.
  9. Press enter at each section where you want to create new slides.
  10. Select view -> normal
  11. Using the Home ribbon, format your slides with a theme and fonts of your choice.

Voila – now you have a presentation from your notes.

To make handouts do the following steps:
  1. Select view->handout master->add info like your name to notes header.
  2. Select file->print
  3. Under slides select 6 slides horizontal.
  4. Select print.

Remember to save!!


Tuesday, April 15, 2014

Office Productivity Series: Mail Merge

One of the best things I learned in college was not in a class, it was at my on-campus job.  My on-campus job in the College of Business Advising Office taught me skills in office productivity.  The most import skill I learned was mail merge.  
Before I had a classroom I took that office productivity home I used mail merge for my wedding invitations, my Christmas cards, my daughter's graduation announcements, and back in my professional life my students LOVE the personal touch mail merge brings to handouts and letters.  

Mail merge is a tool in Microsoft Word that allows you to connect a database to a word processing document to create individual letters, labels, cards, envelopes, etc. 


At test time I like to merge names on tests and send to the copier/printer so I know who still needs to complete the test/assignment and I know who all received and returned the document without students having to put their name on it.  


So how do you get started with mail merge?

It is actually easiest if you start with a database, CSV file, or spreadsheet with data.  I like to download my class list from the school records (i.e. Progress Book) to get started. 

First, open Word and select the Mailings tab in Word 2013.

Choose Start Mail Merge.  You can select the type of file you would like to create or if this is your first time, use the Step-by-Step Mail Merge Wizard...

Then choose your database.
Choose an Excel file, CSV, or you can even type a New list in Word by selecting Type a New List...


Type your letter/document then select Insert Merge Field in the spot you want to put a name or other information.


When finished select Finish & Merge to send the database records (names) with your letters for individual documents.


Office Productivity at it's finest.  
To learn more or practice with a tutorial visit http://www.gcflearnfree.org/word2013/31.