Sway is a presentation tool within Office 365. For the past 5 years I collaborated with the P.E. department to do a physical advocacy project. In the first couple years we used Microsoft Publisher to create a 2-page flyer. The next couple years we created brochures and took them to the local park. I like to you Microsoft tools because teaching students to use the industry standard so they are prepared to use PCs beyond their Chromebooks is awesome.
This year I found Sway. What is awesome about this tool is you can share it via a link, or take the embed code and post it in a HTML webpage. HTML coding is something I've been teaching to 7th grade for the past 5 years so now their research project for physical advocacy went from a newsletter that only myself and the P.E. teachers saw to a brochure that was posted at the park for the community to see, to an online presentation that can be global.
After doing a poll with students the 23 students that have used PowerPoint, Prezi, and Slides they voted 22 to 1 that they preferred doing the Sway.
What's nice about Sway is you can create a new Sway that is blank or from a template, you can start from a topic, or you can upload a document to start your Sway.
Students started from a topic, used the image search to find images with a Creative Commons license, and deleted the pieces they didn't want in their projects.
Try a new way of presenting this year and use Sway in your classroom.
Tuesday, February 27, 2018
Wednesday, September 13, 2017
Google Calendar: Lesson Planning
I've talked about setting up a Google calendar before...today's Google calendar tip is really easy. I connect my Google calendar to my school district's calendar so I can see all the events.
|
|
| Under More button, choose print. Print the calendar for the work week. |
Once I print the calendar I input a brief statement/activity for each class of the week. It's hard to see here but on Friday there is a field trip so I note the number of students that will be on the field trip and plan my activity according to the other activities at the school. Since I added the school calendar I can note when there is a major athletic contest that may interfere with several students completing homework. This is a brief overview before getting to the real plan with precise instructions, standards, and objectives but one more reason for centering my planning around my calendar.
Share how you use Google Calendar in your lesson planning via the comments.
Labels:
calendar,
Google,
Google calendar,
planning
Tuesday, June 28, 2016
Use Your LMS to Organize Your Year
I posted my reasons for using a learning management system (LMS)
for organizing your classroom and delivering content to students in the past. An LMS
can be a great organizational tools for teachers to use to organize their year
even if there is no intent of having students login to the online
classroom. I believe the LMS is a better
way to deliver assignments than posting links to your webpage but having a
classroom webpage can be a great start to get all students on the same page.
Today’s tip is about using the LMS to organize you independent of student work. I
choose to work with Schoology. I use
Schoology because students can upload content from a number of different
resources and it links with Google Drive, YouTube, Khan Academy, etc. The difference with something like Google
Classroom or Learning.com is proprietary software is designed for sharing their resources and I like a little more
variety and control. I can setup my entire classroom, align standards to
assignments, and set due dates and see them in a calendar. Even if I print out PDF pages or never
collect an assignment online I’m able to archive the entire course and the next
time I teach it add or remove resources.
| See how I have folders for each Unit with a description of what’s in the unit. |
| Then if you look inside those units you can see individual resources sometimes links to other websites, sometimes a video, and sometimes a discussion post or assignment. |
Have you ever saved something to use later? Maybe you have not used it for 5 years or
maybe something you used every year for the last 10 years is now out of
date. You don’t have to get rid of the
file, but you can take it out of your course.
I save things to my Resources if I don’t want to get rid of it but it
doesn’t pertain to this course this year.
Use the LMS to organize you! This works for all grades! Then all you have to do is login to the LMS
from any computer to access the content.
No worries about forgetting your flash drive or you forgot to charge
your laptop, just login to another computer because the LMS stores everything
in the cloud.
Tuesday, September 1, 2015
Presenting and presentations
My tech tip this week is about PechaKucha. PechaKucha 20x20 is a presentation format
that takes 20 images and they automatically advance every 20 seconds while the
presenter talks about them. This is a
great way for you as a teacher to present a new topic or for students to give a
non-typical presentation.
It’s not a PowerPoint, it’s not a Prezi. PowerPoint or Google Slides can be used to
create a PechaKucha.
In PowerPoint you can rehearse timings and add
narration in the Slide Show ribbon. Or the presentation can be
given live with the slides advancing and the conversation/speech given on the
spot. This is a great way in a speech
class to force students to practice what they are going to say because the
slide will automatically advance.
See a sample here:PechaKucha sample
Learn how to auto-advance PowerPoint slides: http://www.gcflearnfree.org/powerpoint2013/32
Labels:
Google Slides,
PechaKucha,
PowerPoint,
presentation
Tuesday, March 24, 2015
Create a Google Form to track professional and parent contact
Why a form?
Start with a form that allows you to select the type of contact Parent or Professional
By using a form you don't have to remember what information to log and all the information is in one place and easy to access. This type of information makes sense if you want to track all communication or log time spent on activities all in one place. If you prefer to log information per student this might make more sense to put in your gradebook. You can always copy the information from the form responses into your gradebook comments to keep a log AND keep with student records. I find it easiest to keep all contacts in one place. Emails are easy to save but you still may want to log emails and reference the save location in case you need documentation. Either way, it's smart to log your communication somewhere and I found this to be a quick and easy fix. The initial form takes 20 minutes to make and logging contacts at the time is a breeze.
Start with a form that allows you to select the type of contact Parent or Professional
Question type choose from a list.
Then you can choose the box go to page based on answer if the form will be different based on
the contact type.
I then select the information I want to collect. I make sure I add a time/date option but the
form will be automatically time stamped for the date you fill it out so if you
fill it out at the time of the conversation you don’t have to put in a separate
time/date.
The results will print to a spreadsheet for you to have a
log.
Finally, share your link with yourself on your desktop. I put it on my webpage. It could be a resource in Schoology or you
can put the link in a Word document and save the document to your desktop for
easy access.
Labels:
classroom,
connect,
document,
Google Drive,
tech support,
tip
Tuesday, February 24, 2015
Creating Hyperlinks
Often we want to include a hyperlink in a document or email. This used to be a bit of a process but now we are used to the software recognizing email and website addresses and linking them appropriately. That occasionally causes issues. For example: if I type www.google.com I expect the software to hyperlink my text. Within this blog space however, the links are not created automatically.
Sometimes, especially in web-based and Microsoft Office software the link is generated because the software recognizes a specific format. Sometimes it helps us too much. Example www.epcwellness.org.www.epcwellness.org
This happens because the link itself still has the . even if it's not part of the text. This is an easy problem to fix.
In the program with the non-responsive link, highlight the text
right-click, select Hyperlink, Edit Hyperlink
Then edit the link portion. You should find that there is a section for text people see, and the link that will be visited. It doesn't matter what the display text says so long as the link is accurate.
Sometimes, especially in web-based and Microsoft Office software the link is generated because the software recognizes a specific format. Sometimes it helps us too much. Example www.epcwellness.org.
This happens because the link itself still has the . even if it's not part of the text. This is an easy problem to fix.
In the program with the non-responsive link, highlight the text
Then edit the link portion. You should find that there is a section for text people see, and the link that will be visited. It doesn't matter what the display text says so long as the link is accurate.
Once the link is accurate, hopefully, it will work when you share it. :-) www.epcwellness.org
Wednesday, February 18, 2015
Snow Day Slump
The art of YouTube. I use YouTube a lot these days. I must confess it started as a way to show math concepts to students, often I thought they'd understand it better if someone ELSE explained it. Then I found techniques for taking Praxis tests (what's a Praxix test?). I used it for students and for me. I guess I was behind the trend as my students were using YouTube for entertainment.
Today's tip is for the snow day slump. We aren't getting out and doing much exercise these days, at least I'm not but I created a playlist on YouTube and added 5 10-minute workout videos. I can do them all at once or if I only have 10 minutes do one of them. It took some time to find the ones that suited me but now that they are in a playlist I don't have to hunt for videos I just pull up my playlist and workout.
If you have Chromecast or Apple TV and depending on the device you are using you can show the videos on your TV, that's what I do.
For help making a YouTube playlist: http://www.gcflearnfree.org/youtube/creating-playlists
Today's tip is for the snow day slump. We aren't getting out and doing much exercise these days, at least I'm not but I created a playlist on YouTube and added 5 10-minute workout videos. I can do them all at once or if I only have 10 minutes do one of them. It took some time to find the ones that suited me but now that they are in a playlist I don't have to hunt for videos I just pull up my playlist and workout.
If you have Chromecast or Apple TV and depending on the device you are using you can show the videos on your TV, that's what I do.
For help making a YouTube playlist: http://www.gcflearnfree.org/youtube/creating-playlists
Tuesday, December 2, 2014
Making Sense of the PARCC “Tech Prep” Tools (Part 1)
ELA
It seems that there are plenty of tools to help you prepare
your students for the demands of online testing such as PARCC but what tools
should you use and when? Can any of
these tools be implemented into the daily curriculum of your class? Should these tools be used for teaching
computer/tech skills OR should they
be used specifically to prepare for THE test? I try to make sense of this “stuff” for my
technology classroom and how to connect with classroom teachers in this
post. I’m not saying I have the answers,
I cannot even say how these methods help students prepare or perform on the
tests…they haven’t happened yet, but this is how I’m making sense of them.
Recommendation #1 – take the practice test yourself. Find the grade/subject you teach and take the
test closest to your course so you know what is expected and how it works.
There
are two things teachers will notice
when taking a practice test.
- Types of questions being asked (what content students need to know)
- What technology skills they need to be able to complete a task
I will focus on
technology skills in this post because that’s what I teach.
Different online tools will be helpful for
preparing for the new content assessed and the skills needed to complete.
Click and
Drag aka Drag
and Drop
Practice
tests ask students to find statements in boxes and click on a box and drag it
to another location and drop it. Some
students will want to click on it once to select it but actually you have to click,
hold in the mouse button, drag, and then release the mouse when the box is
moved to the proper location. For students to practice this skill visit:
This onlinepractice allows students to practice highlighting and inserting text in a
sample word processor.
Features that are holiday themed on www.abcya.com also allow students to practice
Drag and drop
features
Drag to highlight
features
In Ohio Infohio resources are available for many
schools/districts/communities. Using http://www.infohio.org/students/er/grade/gk5
and choosing BookFlix Puzzlers
will allow students to practice the drag and drop feature and allow students to
practice comprehension after reading a story.
Multiple
Choice/Dropdown lists
Google Forms: Sample
Make
your own see video
Schoology Tests/Quizzes
Join sample course: 3J9FZ-J4R4K
Make assessments see video
Scroll to
see entire page
A lot of this will depend on screen resolution. Have students practice visiting webpages and
use the scroll wheel, click on the scroll bar and drag and use the mouse pad
such as on a Chromebook.
It is important that
they can click the scroll bar and drag the scroll as well as use the scroll
wheel. I had a student tell me they
couldn’t view the entire page because the mouse was broken…the scroll was
broken but the mouse still allowed for scrolling. Students need to be able to do simple
trouble-shooting while testing.
Keying Text
Schoology Discussion Posts
Google Forms
Microsoft Word Text Boxes – using text boxes is important
because the tests are not traditional word processors, they are boxes and
windows.
Keyboarding
Videos
YouTube www.youtube.com
Digital Video Collection
Infohio users
Tuesday, November 18, 2014
Tech Tip: Using Lists to Organize Your Resources
There are various kinds of lists.
This week I was looking through some “old” stuff. By old I mean the last 2 years. LOL Resources
I saved but had not used yet. I found some resources I could use now but wasn't ready for 6 - 12 months ago or maybe they didn't apply to me yet. It’s
difficult to remember what you’ve read, and where you saw it so
(1) I flag emails as tasks with no due date in Outlook so I
can refer back to them.
(2) Another thing I do is to bookmark sites in my web
browser. I use Chrome and log in to the
browser so I have the same resources at home and at work. I create a bookmarks
folder called Resources. I use this for pages I want to refer back to but I may
not have used yet.
(3) One of the best things about my tech tip blog is you can
go back and read old blogs as reference. I can also subscribe to other popular blogs and that’s really
helpful.
(4) Finally, I will be creating a video repository of my
videos that I've been creating as tips. Feel free to ask questions and
I might be able to answer them via a video response. YouTube video repository
Tuesday, November 11, 2014
Apply, Enter, Register...and win!
I was shocked today at the news, I won! (Details yet to be released.) but it reminded me of the importance of trying, applying, and registering for opportunities. I remember a few years back my daughter won a 50" tv. When asked how she got the tv I replied, she applied. You cannot win if you don't try. Today I had a similar experience and I just want to encourage you, on the heels of a Veterans Day service about service, that without putting yourself out there applying for grants, registering for training, providing a service or trying something new you cannot win! Good luck!
Tuesday, November 4, 2014
Using An LMS
The most powerful tech tool in my classroom is Schoology. Schoology is a Learning Management System (LMS) that connects with other multi-media to help me deliver coursework, collect assignments, and manage individual students within a course.
Since our school uses Google Drive and has accounts setup for all students in grades 6 – 12, and all teachers have Google Drive accounts too, the fact that Schoology connects to Google Drive as an app is HUGE! Previous tip shows you how!
I find with many sources I have information readily available about what tech teachers can use in the classroom but rarely do they show or tell us how to use it. We look at it, say that’s cool, save the email or resource or pin it to a wall of sorts and never really organize it. Or better yet (sarcastic tone), we are so excited we create “free” accounts on every service, do a lesson here or there but never really blend the assignments. Sometimes we don’t go back to the projects or reuse them because they are hard to organize. For that reason alone is why I use Schoology. Schoology allows me to organize all the other resources (tech or not tech) into one location and deliver those resources to students AND collect assignments back from students. I can organize my lessons, align units, lessons, assignments to standards and use all the tech I want. Now listen, I don’t work for Schoology, they didn’t pay me, and well maybe someone that runs their Twitter page might know I exist LOL. To convince you to start using Schoology in your classroom may take more than one blog post, and I’m OK with that. But honestly this is one account you should go create now if you haven’t already. And login to it if you created it but never used it.
To get started, create an account.
Then create a course
From here you can organize your course. I use the free version of Schoology in my classroom so some of the utilities are not available to me but I have all I need to stay organized. Since we use Google Drive I have my students create their own Schoology account using their Google Drive login information. Then I give them the course access code to join my class.
Labels:
Google Drive,
learning management system,
LMS,
online learning,
organize,
Schoology,
teacher,
technology
Tuesday, October 21, 2014
Google Calendar for Work and Home
I used to be addicted to my Outlook calendar. I color coded everything! Work events, kids, holidays, birthdays, to do list...EVERYTHING! The one problem with my Outlook calendar was I couldn't take it with me. Think 2009. I did not have a Blackberry or an iPhone. I did not have money for a phone plan anyway. So, for Christmas I asked for a PDA. It needed something that would work with my already established Outlook calendar, and had WiFi access, you know for when I went to Panera Bread or McDonalds. It could NOT rely on a phone plan to work. So I got a cute little Pocket PC and took it everywhere. It worked great, and my love affair with Microsoft continued. My husband at the time was using Google calendar already. His band dates were on Google calendar, his work appointments, and I refused to convert. "Email me if I need to know what's on your calendar," I would say.
Then it happened. I got a MacBook. I went back to school to teach and thought, I need a new computer, so many schools use Macs, I don't have a Mac, I don't know how to use a Mac...I better get in the loop. Of course the Mac needs the Microsoft Office Suite too. And it was so. Problem...alert! Alert! My Mac that communicated with my PC and shared my Outlook calendar would not communicate with the Pocket PC. My organizational world was OVER. I needed a new plan. That is when I learned to embrace Google Calendar.
I have 2 Google accounts. One for home, one for work. I have 5 Google calendars, and share 2 additional calendars, and have access to view 3 other calendars. It's not as complicated as it sounds because they are all color coded.
One of the best things about Google calendar is my school uses Google calendar as the district calendar so I can quickly save an activity on the district calendar to my own calendar, but only the activities that pertain to me and my building if I want.
Labels:
calendar,
classroom,
computer,
connect,
Google,
Google calendar,
Google Drive,
how to video,
tech tip
Monday, October 13, 2014
Sharing Files With Colleagues
I have found to never underestimate the power of sharing. If you followed my previous tip you are taking a lot of pictures. Maybe you would like to share them??? Sharing goes beyond pictures.
As a teacher there are a lot of resources that need to be shared and they may not be resources available in the student database. For example, I'm in the Ohio Resident Educator Program and need to share documents with my mentor. By using a Dropbox folder I can work on Word Documents downloaded from ODE and save them to a folder local to my computer. Then I have access to them virtually anywhere and can share the folder with my mentor. Dropbox is similar to Google Drive installed on your computer but does not try to convert your files to the Google format. Check out Dropbox
The key to either system is to make sure when the files are shared to edit that you have an understanding that it can be changed or even removed from the folder by the people sharing it. If you want the files to be viewed and not edited make sure you choose that option. If you want the originals intact but want to allow others to edit a file make sure you make a copy first and share the copy.
And for this Tuesday...happy sharing!
As a teacher there are a lot of resources that need to be shared and they may not be resources available in the student database. For example, I'm in the Ohio Resident Educator Program and need to share documents with my mentor. By using a Dropbox folder I can work on Word Documents downloaded from ODE and save them to a folder local to my computer. Then I have access to them virtually anywhere and can share the folder with my mentor. Dropbox is similar to Google Drive installed on your computer but does not try to convert your files to the Google format. Check out Dropbox
View this video of how it works: Using Dropbox
Another method for sharing is the Google Drive. Files in the Google Drive can be shared with others to view only or view and edit. I share files with my mentor using Google Drive yet share forms and documents with students and coworkers using Google Drive, especially those documents created in Google Drive. It doesn't seem necessary for every teacher to collect and update the same data so I collect student favorites in a form and shared it with colleagues so they were in the loop too.
Learn more about collaborating with Google Drive below.
The key to either system is to make sure when the files are shared to edit that you have an understanding that it can be changed or even removed from the folder by the people sharing it. If you want the files to be viewed and not edited make sure you choose that option. If you want the originals intact but want to allow others to edit a file make sure you make a copy first and share the copy.
And for this Tuesday...happy sharing!
Labels:
classroom,
computer,
connect,
copy,
dropbox,
Google Drive,
photograph,
share
Tuesday, September 30, 2014
Tech Tip: Recording Your Screen
Have you ever wanted to show students how to do something but don't have time to create an entire how-to video or even find one? If you have Smart Technologies Smart Notebook installed you can use the Smart tools to record an activity on your computer. You don't have to use your Smartboard/Smart projector.
Below you will see a video I created showing how to access the Smart Recorder.
This method is good for last minute absences where you need to show a sub what to do. Record it on your laptop and post. You can always go back later and add a voice over or make it pretty but this is a quick way to record steps for absent students to post on Schoology or send to Google Drive. Ever considered Flipping your Class? Show your students what to practice at home, then do the assignment in class together.
This technique is another way to show tech support what is going on. If you keep doing an action and not sure of a result and Print Screen doesn't seem to show the problem, consider recording a 5 - 15 second video and attach it to your ticket so they can see what's going on.
Happy Recording.
Labels:
Flip your class,
Recording screen,
Schoology,
Smart Recorder,
Smart Technologies,
Smartboard,
substitute,
tech support,
video,
video production
Tuesday, September 23, 2014
Tech tip: Take pictures
Today's tech tip includes taking pictures. Use your phone, tablet, or a camera to record things you write on the board, student work, or students working. I even have a scanner app on my iPad called scanner pro that scans to PDF so I can email student work to myself or other teachers as needed. You can add your pics to Google Drive or Dropbox straight from your mobile device or upload photos from a camera and organize moments into folders to use, or remind you to use later. Besides how else will you Pinterest your classroom?
Tuesday, September 16, 2014
Tech tip Tuesday: Schoology App
Why? As teachers we all know that the day isn't over when the last bell rings but how do we balance our after-work lives with the papers we have to grade? I've found the Schoology app can help. If I'm sitting waiting on a pizza, or at a ball game waiting for it to start and I have my phone out about to peruse the Internet...I can look at a student assignment post a grade and mark one off the list. No lugging papers.
Not using Schoology yet? Start.
Negatives to the app. Currently...
1) you cannot grade discussion posts
2) you cannot add a rubric to an assignment
Tuesday, September 2, 2014
Brainstorming: Near and Far
Last week I decided I wanted to brainstorm ideas for an upcoming project in class. Each student has a computer so I wanted to do it using their devices. I considered a Google form but I wanted it to be in real time. Google forms allow you to see previous responses AFTER you submit if the option is selected. Then I thought about Poll Everywhere but it's so difficult to organize the ideas and work on them later after collecting the data. That's when a quick Internet search led me to Stormboard. Stormboard is free to educators through December 2014 so check it out.
Stormboard allows you to collect ideas, color code them, vote on your favorite ideas and organize ideas in a number of creative ways. I fould for large classes it works best if you only have 4-5 brainstormers at a time but you can enter your idea, rearrange and categorize it then print a report or Wordle of your results.
I created a Stormboard for us to use to brainstorm for fun! What is your favorite Tech resource for your classroom?
P.S. you can signup using your school Google account if you have one and have your students do the same. THEN you can see their official names instead of them making up their own accounts.
P.P.S. I don't get anything for you using this service or following the link. There is no free space etc.
Stormboard allows you to collect ideas, color code them, vote on your favorite ideas and organize ideas in a number of creative ways. I fould for large classes it works best if you only have 4-5 brainstormers at a time but you can enter your idea, rearrange and categorize it then print a report or Wordle of your results.
I created a Stormboard for us to use to brainstorm for fun! What is your favorite Tech resource for your classroom?
P.S. you can signup using your school Google account if you have one and have your students do the same. THEN you can see their official names instead of them making up their own accounts.
P.P.S. I don't get anything for you using this service or following the link. There is no free space etc.
Labels:
brainstorm,
classroom,
computer,
share ideas,
tip
Tuesday, August 26, 2014
Print Screen
- On your PC/laptop the keyboard has a Print Screen or PRTSCR button. When you press this in most cases you see nothing happen. What occurs is a copy of the current screen to your clipboard.
- Then you can open a software program like Paint or Microsoft Word and simply paste. You will see your picture and you can resize, crop, edit, and print or save.
![]() |
| start button |
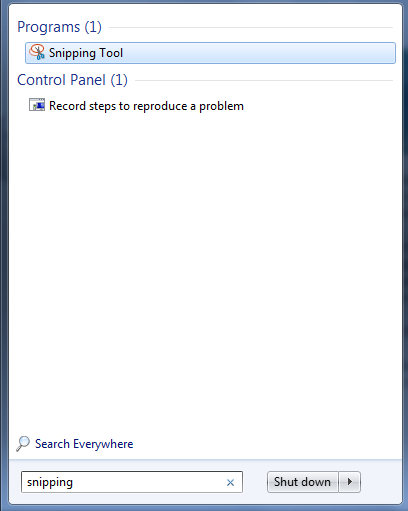
Another method is using the Snipping Tool. At the Start button...
Search for Snipping. If the tool is installed on your computer you will find the program. Click on it one time.When the tool opens you can choose New and click and drag a section of the screen to "snip". Then you need to save the snipped portion.
On your Mac you will choose ctrl+shift+F3 for the entire screen or ctrl+shift+F4 for selecting a portion.
These saved pictures are especially helpful when sharing with Tech Support what you see on your computer screen and you need help. Email the picture as an attachment so they know the exact message you are receiving. Often they can diagnose a problem by looking at the picture.
Happy snipping!
Labels:
copy,
print screen,
prtsrn,
snipping,
tech support,
tech tip
Friday, August 22, 2014
Connecting a Projector
Video: Connect to a projector
Getting back to school finds many teachers eager to show kids new "stuff" but what happens when you're prepared on your laptop and you want to show the entire class. I received many questions this week stating "what's wrong with my projector?"
If you see your desktop background screen on
your projector but not the“stuff” you want to project, odds are good that you
are in extended screen mode.
To fix this you go to start ->
control panel ->
(depending on your setup you may have to go to appearance and settings before
display) ->
display ->
connect to a projector ->
select duplicate.
Tuesday, May 6, 2014
Office Productivity: Find and Replace Paragraph Marks
Today I was working on a project (aka Resident Educator paperwork) and I learned a Tech Tip in Office Productivity myself. J
I had an email message and I wanted to copy the text into a form. The comments were in response to an observation and I needed them to be on a special paper. But when I pasted it the file formatting was not filling the page and it had too many “paragraphs”.
In Tech a paragraph is a hard return, not what you think of as a paragraph from English class.
Anyway, I wanted them gone but I didn’t want to click and delete over and over. Hmmm!
That’s when I thought of find & replace.
I use it all the time to replace he in a document to she, and that is where I found exactly what I was looking for.
Click on Replace in a Word document Home Ribbon. Click in the find what box and select the special button at the bottom of the window.
Voila! There is paragraph and a dozen or so other formatting characters that you might want to find and/or replace. After selecting paragraph mark I then selected the replace field and typed a space (you cannot see it.
Select replace all. Close the window and the text looks a lot better. Doesn't it?
What would you do to remove the > marks? Hmmm!
Subscribe to:
Posts (Atom)